
Feb . 13, 2025 18:37
Back to list
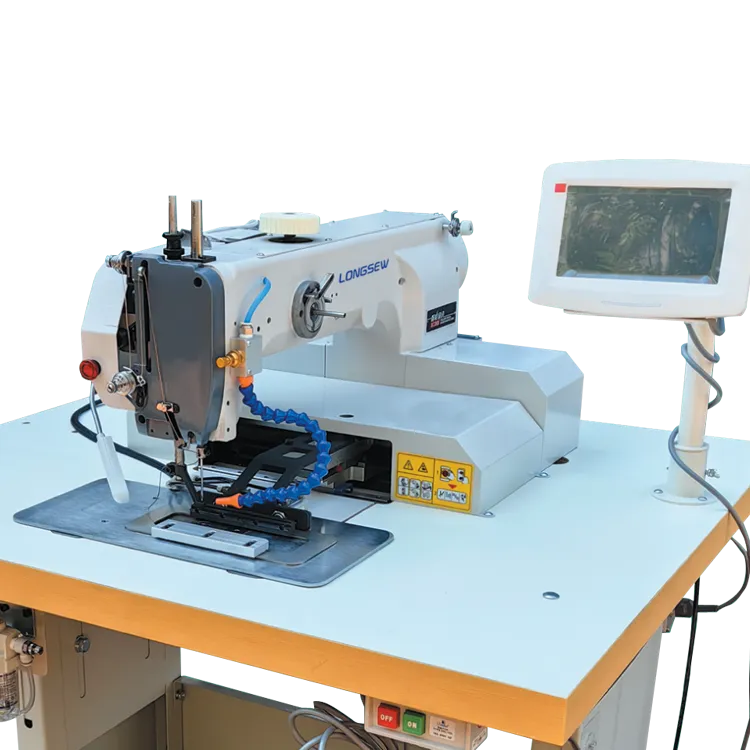
Long Arm Heavy Duty Cylinder Bed Horizontal Direction Sewing Machine For Like Boot Long Barrel Products GA411N
Sewing leather at home can seem intimidating, especially when using a standard home sewing machine. Many assume that such machines are only suited for lighter fabrics like cotton or polyester. However, with a bit of knowledge and some simple adjustments, even the most modest home sewing machine can handle leather projects with ease. This article explores the experiences and expertise necessary for successfully sewing leather at home, ensuring both the authority and trustworthiness needed for curious DIY enthusiasts.
The choice of leather itself can impact the sewing experience. Thinner, more pliable leather, like lambskin or calfskin, is easier to manage on a home sewing machine compared to thicker varieties such as cowhide or saddle leather. Selecting the appropriate leather not only ensures smoother sewing but also aligns with the intended use of the project. It's also important to consider the role of stabilizers and adhesives. Using a temporary fabric adhesive or double-sided tape can hold pieces in place without the need for pins, which can permanently mark the leather. These products ensure precision in sewing, especially when aligning pieces for seams or attaching embellishments. Despite common beliefs, maintaining a regular sewing machine can dramatically impact its ability to sew leather. Routinely cleaning and oiling the machine prevents build-up and ensures smooth operation. Occasionally taking the machine for professional servicing can also rectify minor issues that might impair its performance, especially when transitioning between different materials. Those who are new to sewing leather may find online tutorials, sewing forums, and video guides beneficial. Engaging with a community of like-minded sewing enthusiasts can offer support, answer questions, and provide practical tips tailored to individual projects. There’s a wealth of experience shared by seasoned DIYers, which can prove invaluable for beginners. In conclusion, sewing leather on a home sewing machine is a feasible endeavor with the right tools and adjustments. By carefully selecting needles and threads, adjusting machine settings, and practicing on scrap material, DIY leather projects can be successfully completed. The key lies in understanding your machine’s capabilities and preparing adequately for the task at hand, ensuring beautiful, professional results without the need for industrial-grade equipment.

The choice of leather itself can impact the sewing experience. Thinner, more pliable leather, like lambskin or calfskin, is easier to manage on a home sewing machine compared to thicker varieties such as cowhide or saddle leather. Selecting the appropriate leather not only ensures smoother sewing but also aligns with the intended use of the project. It's also important to consider the role of stabilizers and adhesives. Using a temporary fabric adhesive or double-sided tape can hold pieces in place without the need for pins, which can permanently mark the leather. These products ensure precision in sewing, especially when aligning pieces for seams or attaching embellishments. Despite common beliefs, maintaining a regular sewing machine can dramatically impact its ability to sew leather. Routinely cleaning and oiling the machine prevents build-up and ensures smooth operation. Occasionally taking the machine for professional servicing can also rectify minor issues that might impair its performance, especially when transitioning between different materials. Those who are new to sewing leather may find online tutorials, sewing forums, and video guides beneficial. Engaging with a community of like-minded sewing enthusiasts can offer support, answer questions, and provide practical tips tailored to individual projects. There’s a wealth of experience shared by seasoned DIYers, which can prove invaluable for beginners. In conclusion, sewing leather on a home sewing machine is a feasible endeavor with the right tools and adjustments. By carefully selecting needles and threads, adjusting machine settings, and practicing on scrap material, DIY leather projects can be successfully completed. The key lies in understanding your machine’s capabilities and preparing adequately for the task at hand, ensuring beautiful, professional results without the need for industrial-grade equipment.
Latest news
-
Industrial Bag Sewing Machine Price and Comprehensive Buying GuideNewsApr.16,2026
-
Industrial Hand Held Bag Closer for Efficient Packaging SealingNewsApr.16,2026
-
Industrial Hand Held Bag Closer Sewing Machine for PackagingNewsApr.16,2026
-
Efficient Industrial Bag Closer Sewing Machine for PackagingNewsApr.16,2026
-
Industrial Sewing Guide for Choosing the Right Closer MachineNewsApr.16,2026
-
Guide to Capital Bag Closer Machine Price and Buying FactorsNewsApr.16,2026
-
Say goodbye to inefficient cutting! This heavy-duty webbing hot cutting machine redefines the new standard for industrial cuttingNewsApr.14,2026

Hebei LongSew Machinery Technology Co. Ltd is beginning as sewing machine parts supplier, now Longsew have over twenty years experience in complete set sewing machine offering.


CLASSIFICATION
CONTACT US
-

No.368 North Youyi Street, Shijiazhuang City, Hebei Province, China
-

-

Copyright © 2026 HEBEI LONGSEW MACHINERY TECHNOLOGY CO. LTD All Rights Reserved. Sitemap | Privacy Policy | Top Blog | Global Service | Hot Products